Using WinCopy, Screen Capture Tool
Now you know how to get WINCOPY and have gotten your official copy (or at least your trial copy). It's time to learn to use it. Obviously, you can make it an ICON on your desk top or you can get to it from START. Here's how you would get it by using START:

As you see above, I went to START, scrolled up to PROGRAMs, and then Clicked on WINCOPY. But.. the bigger question is, "How did she get that image as a captured screen". I used WINCOPY!
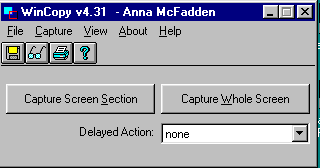
Wincopy will show along the bottom of your screen; there will be the Wincopy icon along the bottom. It just sits there until you need to "snap" (capture) something. Let's say you are surfing along through the Internet and you see a great quote, a photo, a screen of some kind that you want to keep. You click on WINCOPY. It will come up in the upper left top of your screen as a dialog box. It will ask you if you want to capture a portion of a screen or the whole screen.

Here's a tip: See
the DELAYED ACTION? Click on that sometime and you will see how you can
delay the time of the "snap". This is important when you are going
through several steps, such as you see in the first WINCOPY shown in this
lesson (the one beginning at START). As you get better at this, you
will understand the DELAYED ACTION feature. For now... don't worry about
it. Just notice it!
If you select to capture a screen section (portion of the screen), then it will have cross-hairs to indicate the upper left corner of the image to be captured. You draw down and to the right. It will enclose the portion of the screen you wish to capture. When you release the mouse button, that's the portion that you have captured.
Doing the whole screen capture is obvious; it "snaps" the whole screen.
In both cases, then you
are asked if you want to save the file. You do "save as" and get
the following dialog box.
In the example below, I
named the image WINCOPY2. The first one in this lesson was WINCOPY1.
Below you see that I saved the captured image as WINCOPY 2 under my directory
600_fall_99. You notice that the file type is .gif. That's what you want.
Don't change that.

THEN.... when you have saved
your images, you are ready to use them in printed documents, tutorials
like this one, .html pages, or sent in emails!
|
Please
do not use these tutorials without permission from emTech Consulting.
There
is no fee associated with their use, but we ask that you request our permission
before using as part of a tuition or credit class or professional development
program within your organization.
We
also ask that you give credit to emTech when using or reproducing these
materials.
emTech Consulting
Copyright © 2002 Barrie Jo Price, George E.
Marsh II, and Anna C. McFadden
All Rights Reserved