This tutorial can be used to burn CD;s with the Easy CD Creater 5 Basic Software. You may have different (but similar) software that came with your CD burner.
![]()
![]()
INTRODUCTION: A data CD is used for data storage only and cannot be played on your home or car stereo CD player like a music CD. A data CD can typically hold up to 650 MB of data if you have a blank 74-minute CD-R (Read) or CD-RW (Read-Write) disc, and 700 MB of data if you have a blank 80-minute CD-R disc.
A data CD can be accessed on almost any computer that has a CD-ROM or CD-Recorder drive. A data CD is ideal for backing up and archiving important files as well as sharing multimedia presentations, graphics, CAD files, and documents with your friends/colleagues, etc.!
![]()
INSTRUCTIONS:
1. Locate the Easy CD Creator 5 Basic Program Icon
on the Desktop. 
2. Double-click on the Easy CD Creator Icon to start
the program. The first screen that should be visible is below:

3. Now select the type of CD to be created, either Data CD (for Data storage or transferring files) or an Audio CD for music files. For this tutorial, we will create a Data CD.
4. Since we are creating a Data CD, click data
cd project

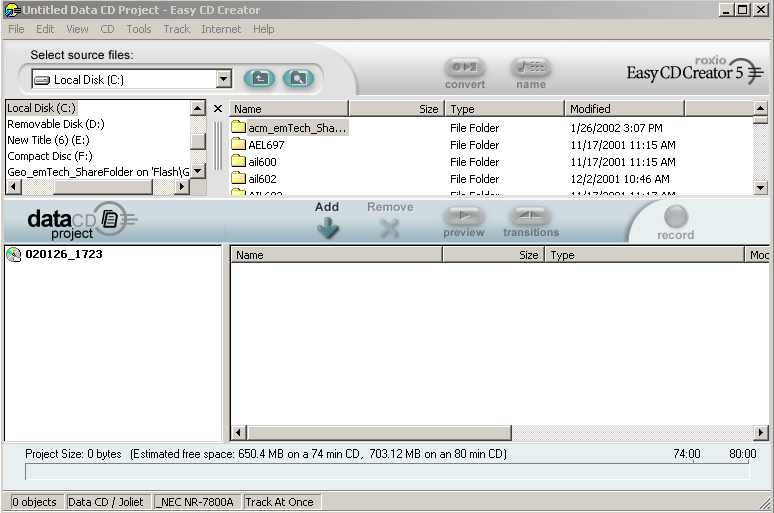
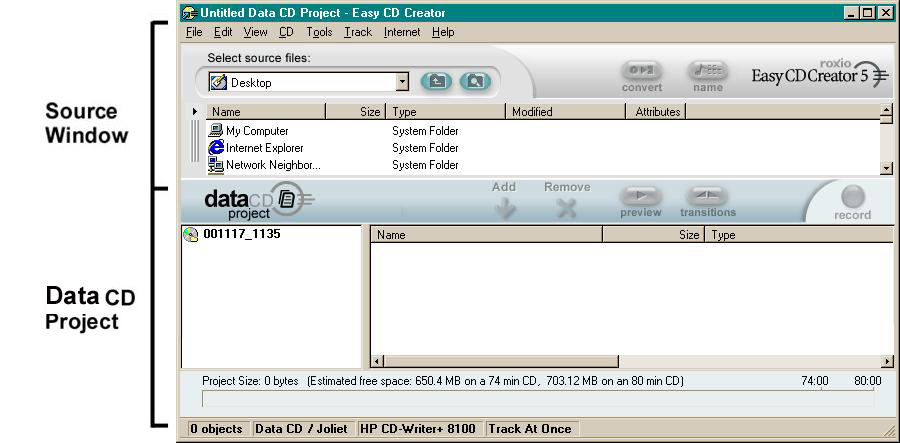
5. You will see this screen:

6. As you look at the screen, the top portion is
the source window where you determine the files you want to copy to your CD.
The bottom of the screen shows the files that will be burned to the CD.

7. Select the folders and files that you want to copy to your new Data CD. Once you have found the files to add to the CD, you will click Add Now. I have selected files located in the directory CSM447.
8. Once the files have been selected, you click
Add Now
9. Now you will be able to determine how much room there is available on the CD Rom for additional files. In the screen below, you will see that there is 139.24 MB available on a 74 min. CD, or 192 MB on an 80 min. CD if additional data is needed to be "burned" on the CD.
109. Once all the files have been added, click
record.
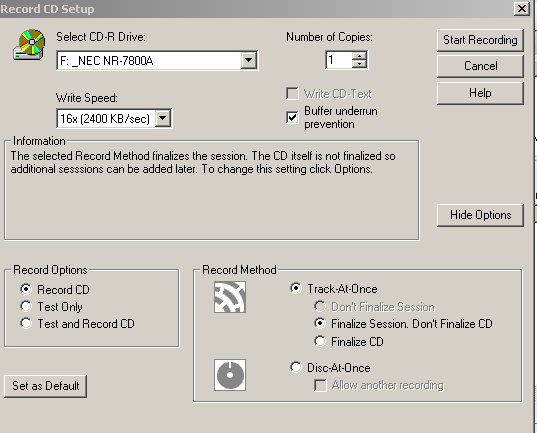
11. You will now see the following screen. Notice that Finalize Session. Don't Finalize CD is selected. This means you can add more data if there is disk space available. (See #8 Above)

| You are now ready to BURN the CD. PLEASE NOTE, when using a CD-R, you will only be allowed to record (burn) to the CD ONCE. Make sure that all the files have been added before you select FINISH. |
12. Make certain you have the CD-R in the CD-R drive.
Click Start Recording.
13. The next screen will show the recording and writing phase:
14. This step also takes time, so be patient.
15. Once the CD has been successfully BURNED, the
CD will be ejected and you will see the following
screen.
.
16. This screen shows that the disk has finished
and that the the CD was created successfully
.
17. Now, click on OK.
18. You will now get a screen that will ask you if you want to save the CD Project changes. If you select YES, you will give the project a specific name and the next time you want to make a CD with the EXACT information you just "burned", select that project name. It will automatically find and add the files you want to "burn".
19. That's it. You've burned a CD!