UPLOADING YOUR WORK TO THE WEB
FOR BAMA
You already have a Bama account and you already have web space provided for your webpages. Here's the web site for your BAMA account. http://helpdesk.ua.edu/email/bama/index.html
Another
important
thing to consider is setting your Bama account shell so you can use FTP
and upload your work. If you
have never uploaded to Bama before, or you
have not done it in a long time, it would be wise to change your
shell.
If your shell is not setup for FTP, then you won't be able to log in.
You can now change your shell from anywhere. . . . from
your cable connection, DSL connection, dial-up, etc.
Below are key screens to help you
with changing
your shell so you can FTP, but if you need further help, go to or call
the HELP DESK at SeeBeck.
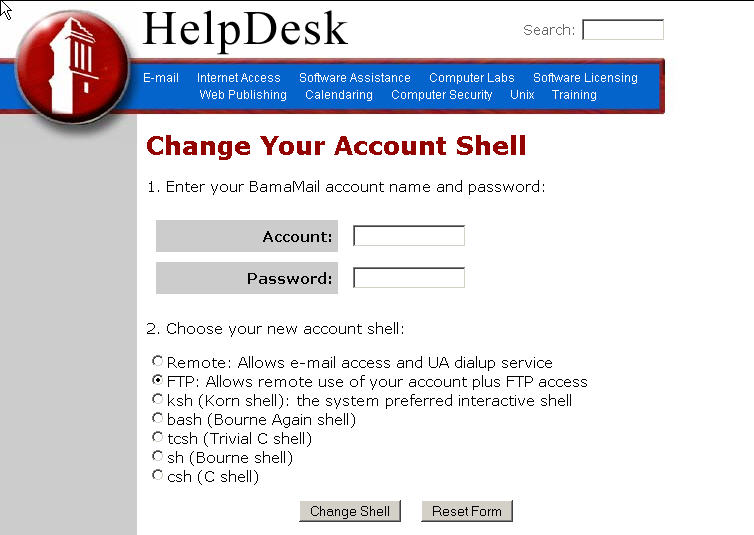
Go to: https://bama.ua.edu/cgi-bin/cgiwrap/~helpdesk/schsh.pl
- Enter Your BamaMail Account Name Example: Penni007
- Enter Your Bama Email Password
- Make Certain that: FTP: Allows remote use of your account plus FTP access IS SELECTED
- Click on Change Shell

 If
you need help with your BAMA account, contact http://helpdesk.ua.edu/email/bama/index.html
FTP Client
In order to be able to upload your work, you need to have a program that will transfer your files to the remote server. This type of program is called an FTP Client. The FTP Client will connect your computer to the remote computer to be able to exchange files. You must be connected to the internet before you use an FTP client.There are many kinds of FTP Clients available. Most of them you can download online and install them in your computer for a trial period before you actually buy it. Most FTP Client programs are easily recognized because they have the word FTP in its name, for example, WS-FTP, CuteFTP, Ace FTP, etc. All these programs work basically the same way.
For this tutorial we have chosen WS-FTP LE which no longer exists; they have now replaced it with WS_FTP Home9.02 . It has a 30 day evaluation (free) period. While what is shown below will not exactly match, it will be similar as all of the FTP programs work similarly. However, you can use your own FTP Client for your computer at home, if you have one. If you do not have an FTP Client installed in your computer, just go to http://download.com and find one by searching using FTP. See the list of others in the paragraph above. . Download it to your computer and install it before you begin the upload process.
Uploading using WS-FTP LE
(Similar to WS_FTP Home9.02 and others)
Once your WS-FTP LE is installed (or which ever client you chose),
connect
to the Internet and launch WS-FTP LE (or your choice).
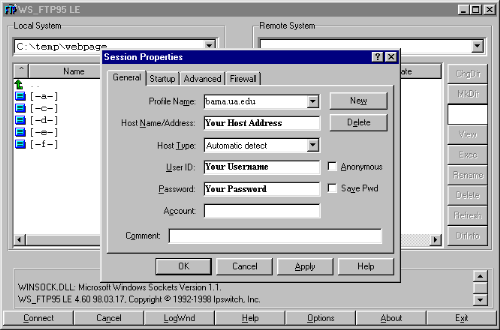
Click on the "Connect" button. In the "General" tab you will see areas to fill in...
- Profile: any name you like -- Example: Bama
- Host: Your host address -- If you are using Bama, the address is: bama.ua.edu
- Host Type: automatic detect
- User ID: your email name --example: smith007
- Password: your password -- your password is encrypted so all you see are asterisks
- Account: leave blank

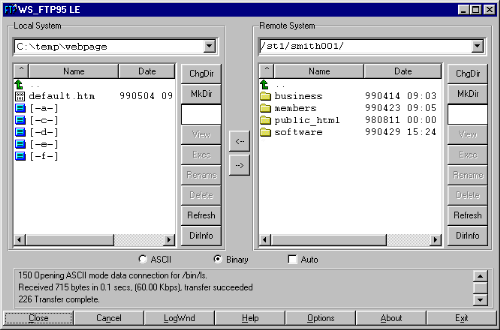
The right side of the window is the "Remote System". In other words, it shows the files and directories/folders in the server that you have access to. In Bama, the remote system will say: /st1/smith001 (You would see your username instead of smith001).
You should have a directory called: public_html in Bama. This is the directory where typically a person would upload their "PERSONAL" home page. (**If you are a GOALS student and you have another Internet Service Provider, (ISP) you might have instructions to go to another directory. Check with your ISP.**) Double click on public_html to move to that directory where your "PERSONAL" webpage will be placed, if you want to develop one, or where you current personal web page is located.

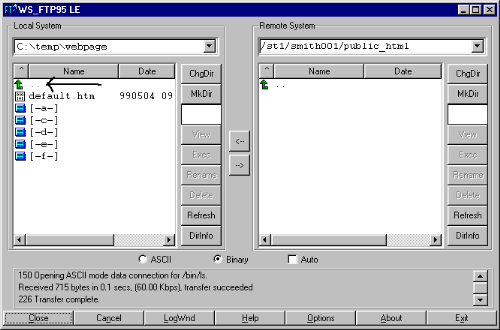
The left side of the window is the "Local System". In other words, this is your computer. What you need to do is look for the drive and directory/folder where your assignments are located. If you need to go to a previous directory within a drive, use the green arrow up (look at the image below). This will let you move to the various folders.
 .
.
Uploading Your CSM 447 Assignments
You will need to make one new directory for the projectss that you upload. This will help organize your files and make it easier for you to manage. REMEMBER: The Bama Server is case senstive. If you create a directory named eport and you types in Eport, you will get an error message saying your page cannot be found.To create the new directory/folder, YOU MUST BE IN YOUR "public_html" directory (or any other initial directory as indicated by your ISP if you are a GOALS student). In order to get into public_htm directory, double click on the public_html folder. You will now see something like:
Once in the "public_html" directory in Bama, click on "MkDir" tab on the right-hand window. Type the name of the new directory (remember: no spaces or symbols, and type it in lowercase). Create a directory called eport for your assignments.
Then, double-click on the name of that new directory you just created. You will now be in that new directory. You should see somthing like: /st3/~your email name/public_html/eport/
Now find your files on your hard drive or disk using the left side of the window, select the files that want to upload. You can select one file, or you can select many files at one time.
- To select one file, just click on it.
- To select several files together in a block, click on the first file. Then go to the last file and click while pressing the "Shift" key. Once the set of files is selected, you can release the "Shift" key.
- To select several scattered files that are not together in a block, click on the first file. Then go to the next file and click while pressing the "Ctrl" key. Continue doing this until all the files you want are selected. Once the set of files is selected, you can release the "Ctrl" key.
 to transfer the
files
to your remote system. This will initiate the upload process, and you
will
see on the lower pare of the window that files are being
transferred.
 When the process is done, you will see a copy of the files you transferred on the right side in the remote system. Now that your webpage is uploaded, you can view it in your browser. Just Open your browser and go to the address of your page. Your address for the example above would be: http://bama.ua.edu/~smith001/eport/index.html (Change "smith001" for your username.) .
Important to Remember:EXAMPLE: coursereader.htm(l) and course_reader.htm(l) are CORRECT file names. An INCORRECT filename would be: course reader.htm(l) (Do Not Use Spaces) Remember that many ISPs, including BAMA, are case sensitive, so there is a difference between uppercase and lowercase letters. If you use spaces your files will NOT come up when viewed online. A similar thing happens if the computer is trying to look for a name that has a different latter case, those files will not appear. BE CONSISTENT: NO SPACES, USE ONLY LOWERCASE. If any of these affect your webpage, go back, fix your problems and upload it again. |
HOW TO FIND YOUR FILES ONCE YOU HAVE UPLOADED THEM TO BAMA!
The "key" to finding your files once you have uploaded is to know the name of the DIRECTORY you made. In the example above, our URL was: http://bama.ua.edu/~smith001/eport/index.html . The part IMMEDIATELY following your name is the DIRECTORY you just created. In the above case, it is eport. That's the directory.
The part following directory name (/index.html in the example above) is what will come up as the 'front page' or 'first page' of whatever you uploaded. In other words, this is the file that anyone going to this URL (Internet address) will see first.
So... if asked where your eport assignments has been uploaded, you would give the URL as:
http://bama.ua.edu/~your email name/eport/index.html
AN ADDITIONAL EXPLANATION ON FINDING
YOUR ADDRESS.
The first part of your address tells
the viewer what server you are using:
The 2nd part of your address tells the
viewer what part of that server:
The 3rd part of your address tells the
viewer what part of your part of the server you want them to view:
The 4th part of your address tells the
viewer what PRECISE file you want the viewer to see:
See the pattern?
A REMINDER:
If you put the address as http://bama.ua.edu/~youremailnameandnumber/eport/resume2.htm but your file is Resume2.htm, then it won't work. Your file name part HAS TO EXACTLY MATCH THE FILE NAME YOU USED.
Digital Tools
Copyright © 2006 Barrie Jo Price,
George E.
Marsh II, and Anna C. McFadden
All Rights Reserved